|
::
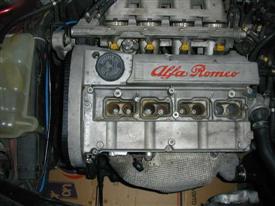
Camshaft Variator (inc. timing belt) Replacement ::
|
|
|
This is an abridged version of the article by Jaap Bouma, often used by owners of Twinspark equipped cars to assist with changing the troublesome cam variator. The belts have to be removed to do the job so it's a good guide for their replacement too. To hear if your variator needs replacing, click on the lnks below: Badly
worn Variator | New Variator It's worth looking at this link if you aren't intending to replace the belts and tensioners on time (36k/3yrs) - Worn Tensioner. DO NOT use the old Alfa recommendation of 72k miles, doing so is likely to result in dead engine and expensive repair bill, even Alfa quote the lower intervals now. If you have any queries about this technical piece or you wish to submit your own article, please email technical@alfa155.co.uk |
|---|
|
The
Achilles heel of the 16V twin spark engines has always been the phase
variator on the inlet camshaft. According to an Alfa Romeo service bulletin,
there have been several editions, the earlier of which were particularly
prone to premature failure. A
service bulletin (Pages 1
2 3)
indicates that the earliest version cannot be replaced without replacing
the inlet camshaft. Later
versions can be replaced or even repaired with a seal/spring kit. Personally
I wouldnt bother with the repair kit, because in my experience the
splines in the variator are also prone to wear. On my car this gave
between 1 and 2 mm of play at the circumference of the pulley. Replacing
the variator is a fairly straightforward job, provided you have the
right cam locking tools to set the timing correctly. If you dont have
the cam locks, dont even think about doing this job. Depending on the
condition and mileage of the engine, you may decide to combine this
job with some other jobs. The water pump is an example. It doesnt have
a reputation for failing, but on my car it had been on the engine for
over 195,000 kms, and its not expensive, so I decided to renew it regardless
of condition. Finally, on a job like this, where you will be opening up the engine on the car, cleanliness is essential. If you get sand, dirt or grit in the engine youre well and truly up that creek. I wouldnt do this job outdoors, especially if its windy! |
|
|---|---|
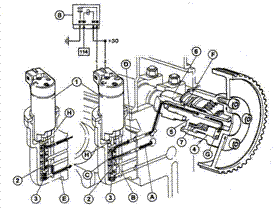 |
The
Phase Variator
(Variator Solenoid details) The
following parts are essential if youre going to do the job properly:
|
Also
recommended:
|
 |
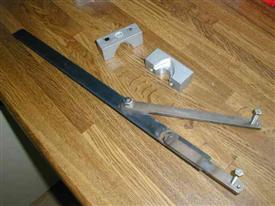 |
The
workshop manual says that you will need a number of special tools, fortunately,
the job can be done without most of these tools. The only ones you most
definitely need are the two cam locking tools which are readily available
online.
The bolts on the spark plug cover, valve cover and inlet camshaft wheel are of a Torx-like type called RIBE, but a Torx T40 bit will work equally well and is more easily available. |
|
A
more or less complete list of tools required is as follows:
1.
First step is to drain the coolant if youre going to do the water
pump, and remove the short hose between engine and expansion tank. 2. Raise the front of the car on axle stands and remove the right-hand front wheel. 3. Remove the plastic cover plate that sits in front of the crankshaft pulley. 4. Find the Top Dead Center mark on the crank pulley and the corresponding mark on the lower timing belt cover. Turn the engine until the TDC marks line up (put the car in fifth and turn the brake disc to turn the engine). 5. Remove the oil filler cap and check that the cam lobes for cylinder 1 are pointing toward the rear of the car. If they are not, turn the crankshaft another full turn until the timing marks line up and the cam lobes below the filler cap point backwards. Piston 1 is now at TDC on the compression stroke. The notches on the balance shaft wheels should line up with the marks on the engine block. 6.
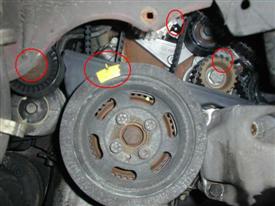
Working from the wheel arch, remove the poly-V belt. Use a 15mm spanner
on the tensioner pulley bolt (see photo) to push the tensioner back
(rotate counter-clockwise), until you have enough slack to slip the
belt off the PS-pump pulley. A second pair of hands comes in handy
here. Remove the belt and bin it |
|
|
7.
Loosen the four allen bolts (6mm) holding the
crankshaft poly-V belt pulley, check the TDC marks still line
up and remove the pulley. 8.
Remove the four allen bolts that hold the lower timing belt cover and
remove the cover. IMPORTANT: Mark the crankshaft toothed pulley and
the engine block with paint to make your own TDC marks. |
 |
 |
9.
At the top of the engine, remove the spark plug cover (six RIBE bolts). 10.
Undo three allen bolts and lift up the coil pack assembly. It helps
if you pull the high tension leads for the secondary spark plugs first.
Put to the side as far as the cables allow. 11.
Pull the injector plugs and the variator solenoid plug. Unclip the plastic
rail holding the cables from the fuel rail and move the whole thing
out of the way as far as possible. |
|
12.
Remove the allen bolts from the black plastic timing belt cover, and
pull the cover upwards to remove. |
 |
|
|
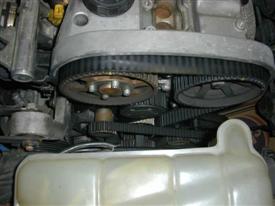
16.
Loosen the 13mm nut on the white timing belt tensioner wheel, and
slide the timing belt off of the pulleys. 17.
Undo three allen bolts (6mm) and remove the timing belt tensioner
idler assembly. 18.
Optional: undo two 13mm bolts and try to remove the water pump without
marking the cylinder head mating face.
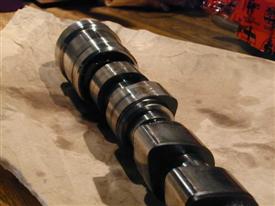
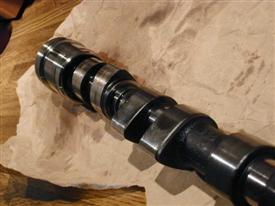
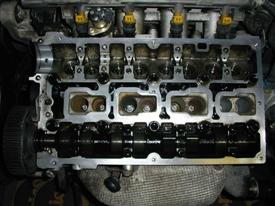
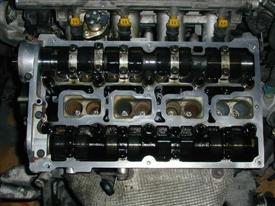
Pictures on the left show a dead camshaft! |
 |
|
|
21.
Remove the camshaft pulleys. The inlet pulley is fitted with four RIBE
bolts (I used a Torx T40 socket), the exhaust cam pulley with a 19mm
bolt which is TIGHT (or should be). Use the pulley tool to keep the
pulleys from turning. 22.
Undo the four bolts (10mm) holding down the camshaft bearing end cap
next to the pulleys and remove the end cap. |
|
|
23.
Remove the small oil seal from the exhaust camshaft end. 25. Remove the bearing cap bolts, firstly just half a turn each to ensure an even spring load on the camshafts and bearing caps. 26. Lift out the inlet camshaft. Clamp it in a vise with soft jaws (I used bits of wood). 27.
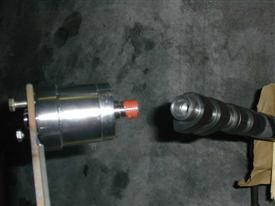
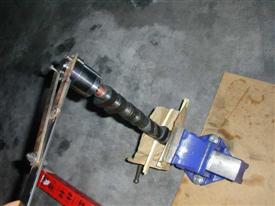
Using the homemade tool, unscrew the phase variator from the camshaft.
This may be very tight, as its loctited in place. 29. Put red Loctite (extra strong) on the threads of the new variator, taking care not to get any into the oil channel, and screw it into the camshaft. Tighten with the pulley tool (see picture) and leave overnight for the Loctite to cure fully. |
 |
 |
|
 |
30.
Remove the old variator bearing shells from the cylinder head and
the camshaft bearing end cap. |
|
34.
Place bearing caps 1, 3, 4 and 5 on the camshaft and GRADUALLY tighten
the bolts most of the way, but not fully. |
|
|
37.
Oil the new oil seals and slide them over the camshaft ends, but dont
push them fully home yet. 38.
Very carefully clean the mating face of the camshaft bearing end cap
and the head, removing all traces of the old gasket compound. |
 |
|
42.
Fit the water pump, which should come with a new O-ring. This is a bit
of a pig, because the O-ring tends to slip out of its groove, which
causes water leaks and misalignment of the timing belt wheel. Not good.
I used a small mirror to check all the way round before pushing the
pump fully home. Use a little Loctite medium on the bolts.
43. Fit the new timing belt tensioner and idler assembly. Dont tighten the nut on the tensioner wheel yet. |
|
 |
44.
Fit the new balance shaft belt tensioner, but do not tighten the nut
yet. Use some Loctite medium on the three bolts. 45.
Remove the inlet camshaft bearing cap on cylinder 2 (you marked this
cap as number 3) and the exhaust camshaft bearing cap on cylinder 3.
Fit the cam locking tools taking care not to damage them on the dowels. |
|
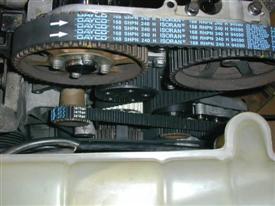
47. Now fit the timing belt around the crankshaft toothed pulley, tensioner, water pump, idler, and camshaft pulleys. Fit the balance shaft belt around the crankshaft toothed pulley, tensioner and balance shaft pulleys, making sure that the marks (small notches) on the balance shaft pulleys are lined up with the marks on the block. For both belts, make sure that the arrows on the belts correspond to the direction of travel. |
 |
|
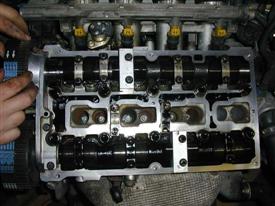
48.
Refit the bottom timing belt cover and check that the TDC marks still
line up. If they dont, fiddle with the crankshaft and the belts and
the whole lot until everything does line up. 49.
Fit the 8mm pin (see tools list) into the hole next to the timing belt
tensioner, and use that and a screwdriver or similar to set the tension
of the timing belt to maximum (pointy indicator on tensioner points
at the steel pin). Tighten the 13mm nut on the tensioner wheel. 50.
Using a screwdriver or similar, adjust the balance belt tensioner until
the indicator sits in the middle of the cut-out in the hexagonal bolt
head in the center of the tensioner wheel (if you look at it you will
understand). Tighten the 10mm nut at the back of the tensioner bracket.
Also tighten the bolts on the camshaft pulleys, using the pulley tool
to hold the pulleys. 51.
Remove the cam locks and refit the bearing caps. Turn the engine by
hand through two full revolutions, taking care not to let the engine
turn backwards at the end of it; not even slightly!! 52. Adjust the timing belt tensioner, reducing the tension until the indicator points at the little hole in the base of the tensioner. Check that the balance shaft belt tension is still correct. You should end up with the timing side of the engine looking something like the picture below. Note the notches on the balance shaft pulleys. 53.
Refit the valve cover. I like to use liquid gasket on the valve cover
gasket, is this is prone to leaking oil all over the place. Be careful
not to overtighten the bolts, as this may crack the cover. 54.
Refit the remaining bits and pieces, connect everything up and put in
new coolant. Refit the road wheel, take the car off the axle stands.
Go out on a test drive and enjoy a reborn Alfa Romeo engine. Youll
be amazed at the difference. |
|
|
The Variator Solenoid The phase variator is controlled by the variator solenoid sitting between the fuel injectors for cylinders 1 and 2. |
|
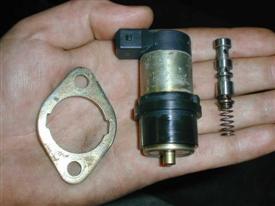 |
Its
an electromagnetic actuator that operates a hydraulic valve against
a spring (see photo). On older cars, it may start to leak oil onto the
inlet manifold. I took the opportunity to fix this leak at the same
time that I did the variator, because the valve cover has to come off
to undo one of the solenoid bolts.
I found that there is no seal or gasket on the solenoid. |
|
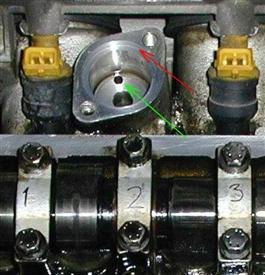
I
Instead, the bore that it sits in has an oil drain hole through which
oil can flow back towards the sump (see green arrow).
On
older engines, crankcase pressure will force oil past the solenoid to
the outside, causing the oil leak. I put some liquid gasket in the recessed
edge (red arrow), taking care not to get any into the bottom of the
bore. I then very carefully slid the solenoid back in, and refitted
its locking plate and bolts with a little Loctite medium. This seems
to have done the trick, but its early days yet. Also, it seems to me
that the symptom of an oil leak because of crankcase pressure must
be a sign of worn cylinder bores. So the next job looms on the horizon
.
|
 |
|
|
|
|
|